JENNY’S FLORENTINES
Christmas is nearly here, and I have been craving something different to eat. A friend and I were having coffee at the beach, and we shared some Florentines. Despite my intolerance to milk products, I thought I would try one. It was nice to enjoy something intensely sweet with a friend. I tasted the sweet treat but stopped at eating the entire biscuit because its ingredients could give me a tummy ache.
Afterward I thought, perhaps I could create a healthier, dairy free, gluten free alternative. I searched the internet and came across a recipe for vegan Florentines at Lazy Cat Kitchen (https://www.lazycatkitchen.com/vegan-florentines/) which I adapted to suit my diet and reduce the glycaemic index.
My recipe contains pecans and walnuts and I have included some seeds in the mix. I used a vegan dark chocolate with less sugar. They are really yummy!
Here is my version of healthier Florentines. I hope you enjoy them, too.
Ingredients:
Method:
Put the pecans and walnuts in a food processor and process until they are the size of large crumbs. Then add them to the remaining dry ingredients (except the chocolate). Stir until the ingredients are mixed evenly.
In a saucepan, place the vanilla extract, maple syrup and coconut oil on a low heat. Heat the ingredients until small bubbles rise to the surface. Stir to ensure the oil is mixed through.
Add the dry ingredients to the saucepan. Mix until all the dry ingredients are thoroughly covered in the maple syrup caramel.
Using patty pans spoon the mixture into the cups (I use a soup spoon for this) and press the ingredients down firmly.
Place in a 180-degree oven and cook for 12 minutes. Then, reduce the heat to 160 degrees and cook for a further 10 minutes. Once cooked, remove the biscuits from the oven. When the biscuits have cooled, remove them from the patty pans.
Warm some water in a saucepan on the stove, then place a metal dish containing the chocolate pieces on top of the saucepan. Stir the chocolate until it has melted. Using a spatula, coat the bottom of the biscuits with the melted chocolate. Then, place them aside to set.
Makes 20 biscuits.
Food intolerance is not easy for any of us, and it is difficult finding tasty, healthy foods which accommodate our diet. Not everyone is tolerant to nuts. So decided to try an alternative to nuts in some of my recipes. This is the first to be altered for those who react to nuts.
Basically, it is the same recipe as the Berry Hazelnut Slice, but I have swapped the hazelnut meal for sunflower meal. As sunflower meal is not readily available where I live, I made it myself using a coffee grinder. I could have used my stab blender or multiprocessor, too. Just place the seeds in the appliance and grind until it resembles fine breadcrumbs.
The change in meal does alter the taste slightly but it does not detract from the delicious berry flavour. Remember, any berries can be used. Just use your choice of berry in the recipe.
I made this for a close friend and gave it to her to taste and give me feedback. I think she was quite touched. She really liked it. I’m still not sure if it was that tasty to her or if she was overwhelmed by the gesture.
I hope you enjoy it, too.
Ingredients
Method
To make the chia egg, mix the chia seeds with the water and wait 5 minutes for the mixture to form an egg-like consistency. Add the liquid coconut oil, maple syrup, lemon juice and vanilla to the egg mix and combine. I used a hand mixer to do this.
Next add the sunflower meal, flour, and coconut. When the mix is combined add the berries. I used my hand mixer for this as I like the berries mixed through. It makes it purple in colour.
Spoon the mixture into a greased and lined slice tray, spreading it to the edges. The batter will be thick.
Bake in a preheated oven at 180 degrees for an hour or when the mixture is cooked. Insert a skewer into the middle and if comes out clean, the slice is ready to be removed from the oven.
Enjoy!
Lately I have been hankering for a chewy biscuit. Mum would make what she called forcer biscuits. She would push a dough through a biscuit forcer. Below is my version which is a low glycaemic index and less sweet alternative for those of us who like chewy, tasty biscuits.
Vanilla Is one of my favourite flavourings so the recipe calls for 2 tablespoons of it. I figure that the flavour compensates for the reduction in sugar.
Again, I have used hazelnut meal, but almond flour is also suitable. For a nut-free version you could try sunflower seed meal.
Coconut oil or butter are good alternatives for the margarine. The coconut oil would add a coconut flavour to the biscuit.
The chia seeds and water bind the biscuit, removing the need for eggs.
I like this biscuit recipe as it satisfies my desire for something sweet while making my tummy feel full. I hope you enjoy it too.
Ingredients:
Method:
Combine the chia seeds and water and leave for 5 minutes or until it is a gel-like consistency. Add the remaining ingredients and mix until combined. The mixture will form a dough.
Roll out the dough on a flat surface. Using a biscuit or scone cutter create small biscuits. If the dough is sticky, dip the cutter in flour before cutting out each biscuit.
Place each biscuit on a baking tray and bake for 20 minutes in a 175-degree Celsius oven. Cook until biscuits are slightly browned on top.
Cool on a rack.
Tuna mornay is one of the meals I eat for comfort. Mum always added a teaspoon of curry powder and an onion to her recipe as she loved lots of flavour. I have inherited this gene from her as I also love flavour in my cooking. She used tin tuna in brine and corn was the only vegetable other than onion in the recipe.
Since I enjoy mum’s tuna mornay, I make a healthier version. I use tuna in spring water instead of brine and add nutritional yeast and more vegetables to justify how often I eat it!
The nutritional yeast adds a unique cheesy flavour. Broccolini is a better alternative to broccoli as its flavour is less dominant. Peas, asparagus, and mushrooms can also be added.
Due to dietary restrictions, I use rice milk instead of cow’s milk, margarine instead of butter, gluten free flour instead of wheat flour and lactose free cheese instead of normal cheese.
I hope you enjoy this version as much as my friends and I do!
Ingredients:
Method:
Steam the beans, broccolini, capsicum and zucchini until nearly cooked.
In a large pan, melt the margarine. Next, add the curry powder and heat it to release the fragrance. Add the onion and cook until transparent. Then, add the flour and stir to into the melted margarine, curry, and onion mixture. Cook, stirring for 3 minutes.
Gradually add the milk, stirring constantly. Continue to stir while bringing he mix to a simmer, then reduce the heat and cook for 5 minutes to ensure the flour is cooked.
Mix in the nutritional yeast, then add the grated cheese. Stir until melted.
Finally, drain the tuna and corn and add to the sauce along with the cooked vegetables. Heat to warm the mornay.
Serve and enjoy!
Crackers and cheese are one of my favourite snacks when I’m peckish. In my search for a suitable cracker for my diet, I could not find one with enough seeds for my liking. Most store-bought dry biscuits are made with flour with some seeds mixed through, but I wanted a recipe with mostly seeds.
After some looking I came across a recipe at Moorlands Eater (https://moorlandseater.com/easy-seed-crackers/) which looked pretty good. It has no flour which makes it healthier than most. I have adapted the recipe slightly, to suit my diet.
Roasting the seeds in the oven to release the oils makes this cracker tasty. The crackers are easy to make, delicious and incredibly healthy. Although they taste good, they do not give me the same urge to keep eating as flour-based crackers.
Any seed could be included in the recipe, but do not change the ratio of seeds. The proportion of chia seeds is important as the they create a gel which holds the crackers together. I have chosen to add nutritional yeast for its cheesy flavour, and I like cumin. Feel free to add or take other spices or herbs to your liking.
To save electricity, I make three trays of crackers (this recipe makes one tray only) and place them in the oven at the same time. Sometimes I use slightly different ingredients on each tray for different flavoured crackers.
I do hope you enjoy them.
Ingredients:
Method:
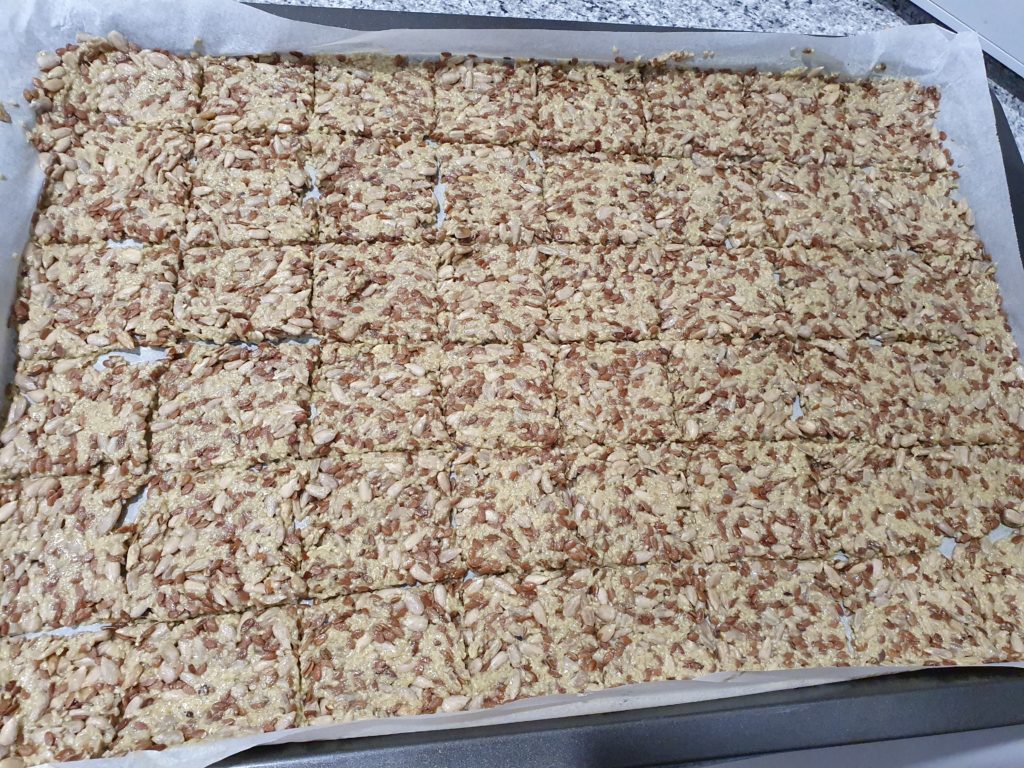
Place the dry ingredients in a bowl and stir to mix evenly. Add the water and set aside for half an hour. The mix will form a gel which will create crispy crackers when dried out. Stir the mix to check if the consistency is correct.
Line a biscuit tray with baking paper. When the consistency of the mix is gel like, spread it evenly over the tray ensuring it reaches the sides. Make sure that no baking paper can be seen beneath the mixture. I have found a wet spoon is great for spreading the mix.
Once the ingredients have been spread evenly over the tray, use a knife to gently mark out the biscuits. Any size is good, but I tend to make them around the size of a standard cracker.
Place the tray in a preheated oven at 150 degrees Celsius. Cook at this low heat for half an hour then check the crackers to ensure they are crisp.
Be careful not to leave them too long as they will burn. Also, the temperature must be low to give the crackers time to dry out.
When the crackers are crisp, remove from the oven and leave to cool. When cool break into the marked-out crackers. Store in an air-tight container.
Enjoy!
Quiche and Egg and Bacon pie are meals I really miss. These are just two of many old recipes that are now off my list because of egg intolerance. Once again, I went on an internet search and came up with my own alternative.
It’s nice to sit down to a ‘one pot wonder’ and this is a great recipe to hide nutritious vegetables. I added nutritional yeast to the mixture as I find it is a great substitute for meat protein. It is filling and nutritious. Without eggs, the mix does not congeal but it is really tasty.
This makes a large tray of the pie which I eat over several days.
I hope you enjoy it as much as I do.
Ingredients:
Method:
Heat the oven to 180 degrees Celsius and prepare a large baking dish by oiling the sides and base.
Place all the ingredients in a large bowl for mixing. Use your hands combine the ingredients, making sure all the mixture is moist. Tip the mix into the prepared baking dish.
Place in preheated oven and cook for one hour, or until the added ingredients have softened.
Remove the dish from the oven and spoon the pie into bowls to serve.
Notes:
Toasted hot crossed buns were one of my favourite Easter Saturday treats. The smell of the toasted spiced buns wafting through the house would fill my senses.
I yearn for the taste of those spices again but Easter buns suitable for my diet are not available locally. So, I created a low GI version with all the spice of the original recipe. That way I can enjoy the spice without the guilt or a reaction.
Any plain yoghurt can be used. My preference is lactose free, replacing this with coconut yoghurt will make the muffins vegan friendly. If you are unable to eat gluten, use gluten free flour. The chia seeds and water can be substituted with eggs. Almond meal can be used in place of hazelnut meal.
This recipe would also be great as a Christmas treat. I hope you enjoy these as much as I do.
Ingredients
Method
Mix the chia seeds and water, set aside for 5 minutes or until it thickens and is gel-like in consistency.
Place all the wet ingredients in a large bowl, add the chia mix when it is thickened and blend together.
Combine the wet and dry ingredients. I used an electric hand mixer for ease, but the ingredients can be mixed with a spoon. When the wet and dry ingredients are combined, add the sultanas, and stir them through so they are distributed evenly in the mix.
Spoon the mixture into greased medium-sized muffin pans. Place the muffins in an oven which has been heated to 160 degrees.
Bake for 20 minutes, then turn the pans and bake for a further 10 minutes. Insert a skewer to test a muffin. If it is clean when removed, the muffins are cooked.
This recipe makes 12 medium-sized muffins.
One of my favourite sweets was a raspberry coconut slice. I loved the flavour of biscuit mixture covered with sweet, raspberry jam and toasted coconut on top.
I searched for a healthier alternative with a low GI and ingredients which were on the list of foods in my diet. For this reason, I have used blackberries instead of raspberries and there are no eggs in the recipe. I have substituted a chia egg for a regular egg to bind the mix.
Nut meal is the main ingredient and I have kept the amount of maple syrup to a minimum to reduce the GI. Any nut meal can be used, almond meal is a good equivalent to hazelnut meal, and honey can be substituted for maple syrup.
The slice has a fudgy texture from the mixture of hazelnut meal and the chia egg. Most of the sweetness is from the berries. Any berries can be used, blueberries, raspberries or mixed berries are all alternatives to blackberries. I suggest you choose your favourite berry.
This slice is a favourite amongst my friends, who I use as taste testers for my recipes. I hope you enjoy it too.
Ingredients
Method
To make the chia egg, mix the chia seeds with the water and wait 5 minutes for the mixture to form an egg-like consistency. Add the liquid coconut oil, maple syrup, lemon juice and vanilla to the egg mix and combine. I used a hand mixer to do this.
Next add the hazelnut meal, flour, and coconut. When the mix is combined add the berries. I used my hand mixer for this as I like the berries mixed through. It makes it purple in colour.
Spoon the mixture into a greased and lined slice tray, spreading it to the edges. The batter will be thick.
Bake in a preheated oven at 180 degrees for an hour or when the mixture is cooked. Insert a skewer into the middle and if comes out clean, the slice is ready to be removed from the oven.
Enjoy!
Although I like tomatoes, I get abdominal pain after eating them. I am sure I am not the only one. Some people get gout. Despite trying tomatoes in various forms, I always suffer from abdominal discomfort. Hence, I avoid them.
There is comfort in sitting down to a meal of pasta covered in a rich tomato sauce. Some of the most popular Italian foods contain tomatoes, so eliminating them from my diet has meant the end of dishes like spaghetti bolognaise, pizza and lasagne for me.
Yesterday I had a real yearning for a bowl of pasta covered in rich tomato sauce and I searched the internet. The closest alternative to tomato is capsicum, or bell pepper. I found a recipe from “Our Little Homestead” (https://ourlittlehomestad.org) called “No Tomato Spaghetti Sauce”.
The original recipe uses olive oil, but olives are off my list, too. I used rice bran oil instead and added zucchini and mushrooms.
I hope you enjoy my version.
Ingredients
Method
Cut the capsicum into pieces small enough to fry in a pan. Place the oil in the pan and heat it until warm enough to fry the capsicum. Place the capsicum pieces in the oil with the skin down and fry until the skin has charred black spots. When the skin is cooked, place a lid on the pan to soften the flesh. When cooked, remove it from the pan to cool.
Chop the onion and place in the pan with the garlic and stock cubes. Cook until the onion is transparent, then add the chicken to the pan.
While the chicken is browning, place the softened capsicum in a food processor and pulse until the texture resembles tomato paste. Add this to the browned chicken mixture and simmer for 5 minutes, then add the chopped zucchini and mushrooms. Simmer for a further 5 minutes or until the zucchini and mushrooms have softened.
Serve with pasta. I used red lentil noodles because they have a lower glycaemic index than wheat or rice pasta.
Enjoy!